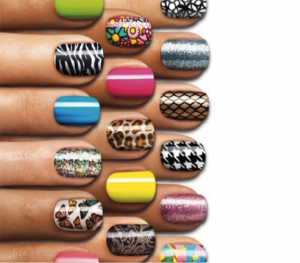
The Newest Nail Trend: Hot Polish Strips
Nail paints and nail art: two of the most admirable fashion techniques that have witnessed various changes with growing time is on a boom. With the nail art industry growing in heaps and bounds, it has bestowed its customers with glamorous and chic styles of painting and beautifying our nails. Nail polish strips is a recent development that has savored that taste of glory and acceptance. Every girl or woman wants their hands to shine bright and look voguish all the time. The nail polish strip is just a very fun and festive way of doing it. But what are they actually? These strips are like stickers that can be peeled off and applied to the nails. Then you can cut them off according to the shape of your nails and flaunt them in style. They come in various colors and patterns with artistic display of work. You can mismatch them with your attire and you are ready for any occasion. Following are a few tips that might help you to put them in the right manner and make them long lasting:
- Before you apply a nail polish strip, make sure your hands are properly manicured: your nails and cuticles are clean and evenly shaped for better results. With a number of nail care products available in the market, you can do a self manicure at the comfort of your home if you do not wish to go to a salon and pay lots of money!
- Always ensure that there is no base coat applied to your nails before you apply these strips. The base coat or any moisturizing cream present on your nails will make it very difficult for the nail polish strips to adhere properly. So dry them out with a nail paint remover or an acetone before you apply these strips.
- Before you apply these strips just rub them with your fingers in an even manner. This will generate heat and make them more flexible while you apply them.
- The nail polish strips come in various sizes. So you have to match them with a particular nail bed and then cut them accordingly. For example, if you have a nail bed which is tiny, take a bigger strip and strip it down to the exact shape and size. Then place this closest to the cuticle. Rub it down to make a smoother surface. Once the strip is placed smoothly, quickly dry that nail either in front of a table fan or a hair dryer. This will help it stick there properly.
- The next step is filing them correctly. The strip is not designed according to the shape of your nail. So you will have to cut it down with a scissors and then shape it with a filer. So place your nail in a position that it becomes easy for you to shed off the extra bit. After cutting down the extra, get a clean finish by smoothly filing out the rough edges. Use this technique for each of your nails.
- After the application of the nail paint strips to all your nails, add an extra glossy finish to it. Add a top coat that would add sparkle and shine to your nails. To prevent chipping and destruction of your art work, make sure you take care of your hands properly. When in the kitchen or doing some messy cleaning work, make sure your hands are covered to avoid direct contact to heat and moisture that would damage the strips.
- When your cuticles start to grow, you will feel the strip losing its edge from that end. For this you can apply nail paint to that part in some good design like a half moon. This would help you keep those strips long lasting. And when they start to come out, just gently remove with help of a nail paint remover and make sure to clean your nail well. Happy painting!


